MGB Photography

A blog focusing on photography styles, tips and tricks, Photoshop, and portfolio creation.

  • About

Photoshop is a wonderful tool to use once you are comfortable with digital photography. This tutorial will show you how to use Camera RAW to apply adjustments and enhancements to your photos. You will learn how to work with tone, colour balance, and understand what the main sliders do. Please note, that in order to achieve the best results in Camera RAW, you should work with a RAW file, not a JPEG.

Here is our starting image, shot on a weekend trip to Quebec City during the summer of 2020.

As you can see, it is very dark and underexposed. With this tutorial, we will bring life and colour back into this scene.

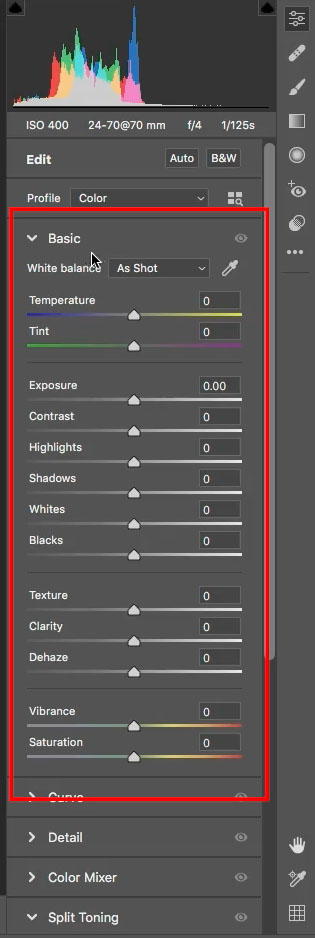
First, we will use the basic panel in Camera RAW to do the majority of the adjustments. We will begin fixing the tones in the image.

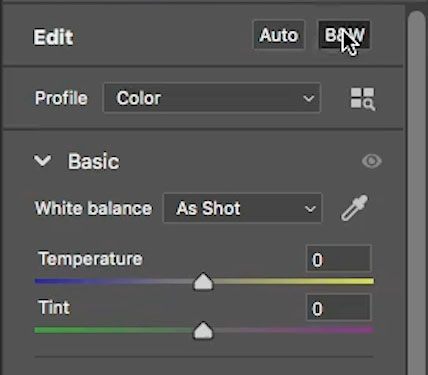
Change the image to black and white with the B&W button. This is not necessary, but it helps to see what is happening with the tones in the image without the distraction of colour.
Start with the Exposure to adjust the overall brightness. Then use the Shadow and Highlight sliders to recover details lost in the shadows and highlights. By moving the Shadow slider to the right, the shadows aren't as dark. Opposite for the Highlights, move the slider to the left, and the highlights aren't so bright. This allows us to see more details.


Click on B&W once again to bring the colour back. There is a noticeable difference already. Because we worked in black and white, we may need to adjust the Shadows and Highlights slightly to bring it to what we are looking for.

Now, perhaps there are some white areas that are a bit dull or overly bright. We can use the Whites slider to fix this. If you bring the slider to the left, you will lower the white point, and to the right would raise the white point. The same thing applies to the Blacks slider.

We've worked on the basic tone, now we will adjust the Texture, Clarity, and Dehaze. These sliders are the Presence sliders. Because it was a darker photo originally, there is a bit of graininess now that we have brought it back to brightness. We will tone this down slightly by adjusting the Texture to -5. To compensate this, increase the Clarity to add edge definition to avoid losing too much detail. Finally in this section, bump up the Dehaze slightly to increase contrast within the photo.


Now it's time for colour adjustments. Most of these are subjective to your preference. I personally like to make the unique colours in an image pop, but at the same time allow for the subject of the photo to stand out. Navigate down to the 'Color Mixer' tab, and ensure that HSL is selected. HSL stands for Hue, Saturation, and Luminance. Hue is the variety of a colour (i.e. reddish orange vs yellowish orange), saturation is the amount of colour, and luminance is the brightness within a colour. 

I usually do not touch Hue, unless my image is shifting slightly in a different colour tone than I would like, so I begin with Saturation. I start focussing on the areas I want to stand out: the umbrellas, the trees scattered around, the purple flowers on the windowsill. That means increasing the blues, greens, and purples as necessary. Then adjust those elements that I want to blend into the background, such as the orange/yellow hue from inside the cafe, coming through the windows. This means decreasing the oranges and yellows. I also decreased the aquas, as once I brought up the blues, the logo on the umbrellas was too prominent for my liking.

Then we work with the Luminance. As mentioned, luminance is the brightness within a colour. In this case, I wanted to slightly the reds throughout the image (mainly to brighten the faces of my subjects), increase the aquas and blues (brighten the umbrellas), and brighten the purples (brighten the flowers).

 
And voila! Here is the finished image. There are a few little things that I would edit out in Photoshop, but that's a tutorial for another time. Stay tuned!
Happy editing! 


I recently had the opportunity to take photos for a local restaurant in Ottawa. It was a completely new experience, as I have never taken food photos before (except for quick cell phone shots, of course). I was honest with them about being a newbie, but they still trusted me!

The manager had said that they wanted their food plated, and against a white background; and so, I set up a light box. A light box is great for product photography, especially when you need a seamless background. You can purchase inexpensive light boxes on Amazon, or build your own using a cardboard box, white paper or fabric, and a couple lights or lamps! As for lenses, I brought my trusty 24mm f1.4 prime lens. While is not a typical food photography lens, it was the best I could do without purchasing new equipment. Other great lenses to use: 35mm f1.8 or 50mm f1.4. All of these lenses, with the low aperture capacity, allow for a great variation in depth of field, if you're looking to make your photos have that blurred background look. While I prefer to shoot with my camera in my hands for freedom, I also brought along a tripod to get those shots which required a longer shutter speed.

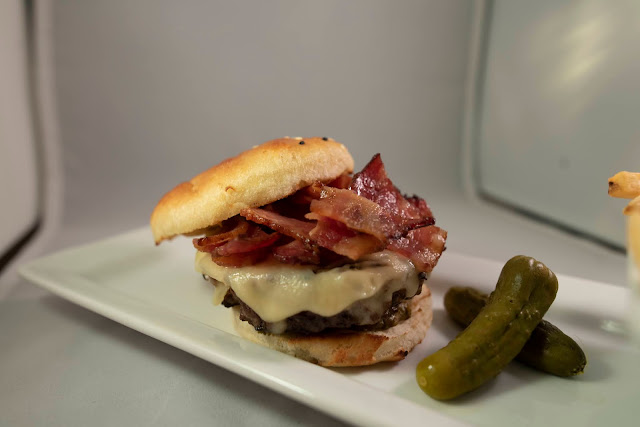
Then it was time. First and foremost, the white balance needed to be set to match the room I was shooting in. It was a fairly dark room, and so I was a little nervous shooting the first food - a tray of nachos - but eventually got the hang of it. A lot of trial and error, 35 dishes, and 1100 photos later, we were done! Then it was time to bring the photos home and edit. Below is the before and after of the restaurant's signature burger:

Edited, final image of restaurant burger
After (Editing: Adobe Photoshop & Camera RAW)

Unedited, original raw image of restaurant burger
 Before (ISO-400, f/4 1/30s)

As you can tell, the original photo was dull and lacking life, but editing is where the photo really comes to life. Using Photoshop, I started with removing the edges of the light box, did spot corrections, and overall photo clean up, then brought the photo into Camera RAW for colour and light editing. While I had set the white balance when shooting, sometimes it doesn't come out quite as planned, as such in this case. Camera RAW allows you to whiten and brighten your photo, as well as the option to adjust every colour as you like. Once the colour was right, next was tweaking of the contrast, brightness, vibrancy, and sharpness. Once the first photo was set, I copied the settings to all other photos of similar lighting and colour.

I was content with how things turned out (especially since it was my first experience shooting food!), as was the restaurant! They'll be using the photos in their menus.

It's a difficult task. You just want them to sit still, they keep moving around, and everything except their face is sharp. But you can't be mad a them because they're just so darn cute. If you're a pet owner, you know what I'm talking about.

Taking photos of animals can be tricky, but it's a good way to get some training in. When taking pet portraits, you need to know what will catch his attention? What will make her sit still? How can you capture her at her most content? These questions can apply to humans as well, especially children. If you're taking photos of your own pets, you can judge these things on your own. If you're photographing a client's pets, it can be trickier. Try to talk with the client ahead of time to understand what kind of temperament you will be working with. Maybe their dog is afraid of the camera flash? You will need to know this knowledge in advance to prepare accordingly. 

What do animals and sports have in common? They require a fast shutter speed. By using a shutter speed of 1/250 s or faster, you will will have more success of capturing a clear photo. Some of the best pet photographs are dogs in their natural habitat, doing what they do best: playing. Try photographing a dog as he jumps to catch a ball, or a cat playing with a mouse toy. These will show the expression in their eyes.

Speaking of eyes, get to the animal's eye level when shooting photographs. This creates a more personal touch in the image, and brings out personality. Natural lighting is also a preferred option to shoot pets in. As mentioned before, maybe you're working with an animal that is afraid of the camera flash; natural light eliminates that worry. It's also the easiest lighting option to work with. Selecting an environment beside a glass door or window that's not directly facing the sun will work best. Natural lighting from windows creates a softer light, that doesn't create harshness on the subject.

Close-up of grey cat with green eyes

Finally, be patient. Much like taking photos of children, your pet subject may be cranky or sleepy. Unless you want to capture these expressions, it's best to wait until the moment is right. Don't stress your pet if they just woke up, finished eating, or just generally want to be left alone. A helpful tip when the time is right, is to use treats and toys. Maybe your cat won't look towards the camera, but a food bribe will catch their attention. Of course, if these pets are not your own, always check with the client for permission before offering treats. 


Whether you consider yourself a photographer or not, everyone takes photos while travelling. Some carry their iPhone, while others carry a DSLR across the world.

Travel photography incorporates many areas of photography: landscape, street, architecture, action, and lifestyle. It could be a snapshot of time, culture, or emotion. Travel photography is no easy task. It requires adaptable skills, versatility, and patience; you may be waiting for the perfect shot for hours, but may never get it. Social skills is also an advantage. It will make it easier to take portraits of people you encounter on your travels, should you enjoy portraiture. Maybe people aren't your thing, and you prefer to shy away behind your camera. That won't stop you from capturing the hustle and bustle of a capital city, or the colourful architecture of an ancient temple.

Temple within the Batu Caves, Malaysia

As a travel photographer, you'll constantly be on the move. A backpack filled with equipment will slow you down. Minimal equipment while travelling is key. You may believe that you need those extra lenses in your kit as a 'just in case', but trust me, leave it behind. Your back will thank you. At most, pack three lenses: a wide-angle, telephoto, and perhaps your nifty 50mm. This will cover most (if not all) shots you'll encounter. A tripod can make or break a good photo. You may be thinking, "Leave my lenses at home but bring a tripod?! That'll make for so much weight!" Luckily, there are a variety of decent lightweight tripods on the market, that will easily attach to a backpack. You'll forget it's even there.

Other useful photographic items to bring while travelling:
  • UV and circular polarizer filters
  • Laptop or tablet
  • Storage devices (portable hard drive, USB key)
  • Small camera bag
  • Extra camera batteries and memory cards
  • Cleaning equipment
  • Waterproof bags

Home

ABOUT ME

Hi! I'm Megan — graphic designer by trade, photographer by hobby.

Categories

  • animal photography 1
  • animals 1
  • camera raw 1
  • food photography 1
  • food photography for beginners 1
  • learning experience 2
  • macro pet photography 1
  • pet photography 1
  • pet photography for beginners 1
  • pet portraits for beginners 1
  • pets in motion 1
  • photo edit 1
  • photo editing 1
  • photo tips 3
  • photography 2
  • photography learning experience 2
  • photography packing list 1
  • photography tips 3
  • photoshop 1
  • pub food 1
  • restaurant 1
  • restaurant photography 1
  • temple photography 1
  • travel photo 1
  • travel photography 1
  • travel photography for beginners 1
  • travel tips 1
  • travelling photographer 1

Search This Blog

Blog Archive

  • April 2021 (2)
  • February 2021 (1)
  • January 2021 (1)
Powered by Blogger.

Pages

  • Home
  • About

Designed by OddThemes | Distributed By Gooyaabi Template